

[ Day 2 ] 캐릭터를 이동 시켜보자
2024. 7. 2. 17:10ㆍGame Develop

오늘 귀여운 버섯도리와 함께
캐릭터를 이동 시켜보겠다
일단 Animation을 만들어주겠다
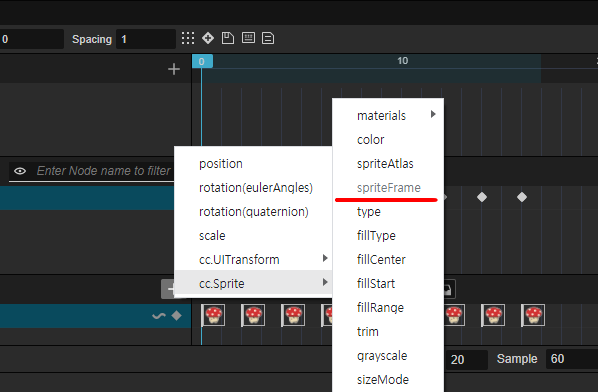
Animation 생성을 원하는 객체(Node)를
클릭하면 Animation을 생성할 수 있게 되는데
Property에서 spriteFrame을 선택해준다
(안되는게 아니고 이미 내가 뒤에 spriteFrame
Property 애니메이션을 만들어서 그렇다 걱정ㄴㄴ)
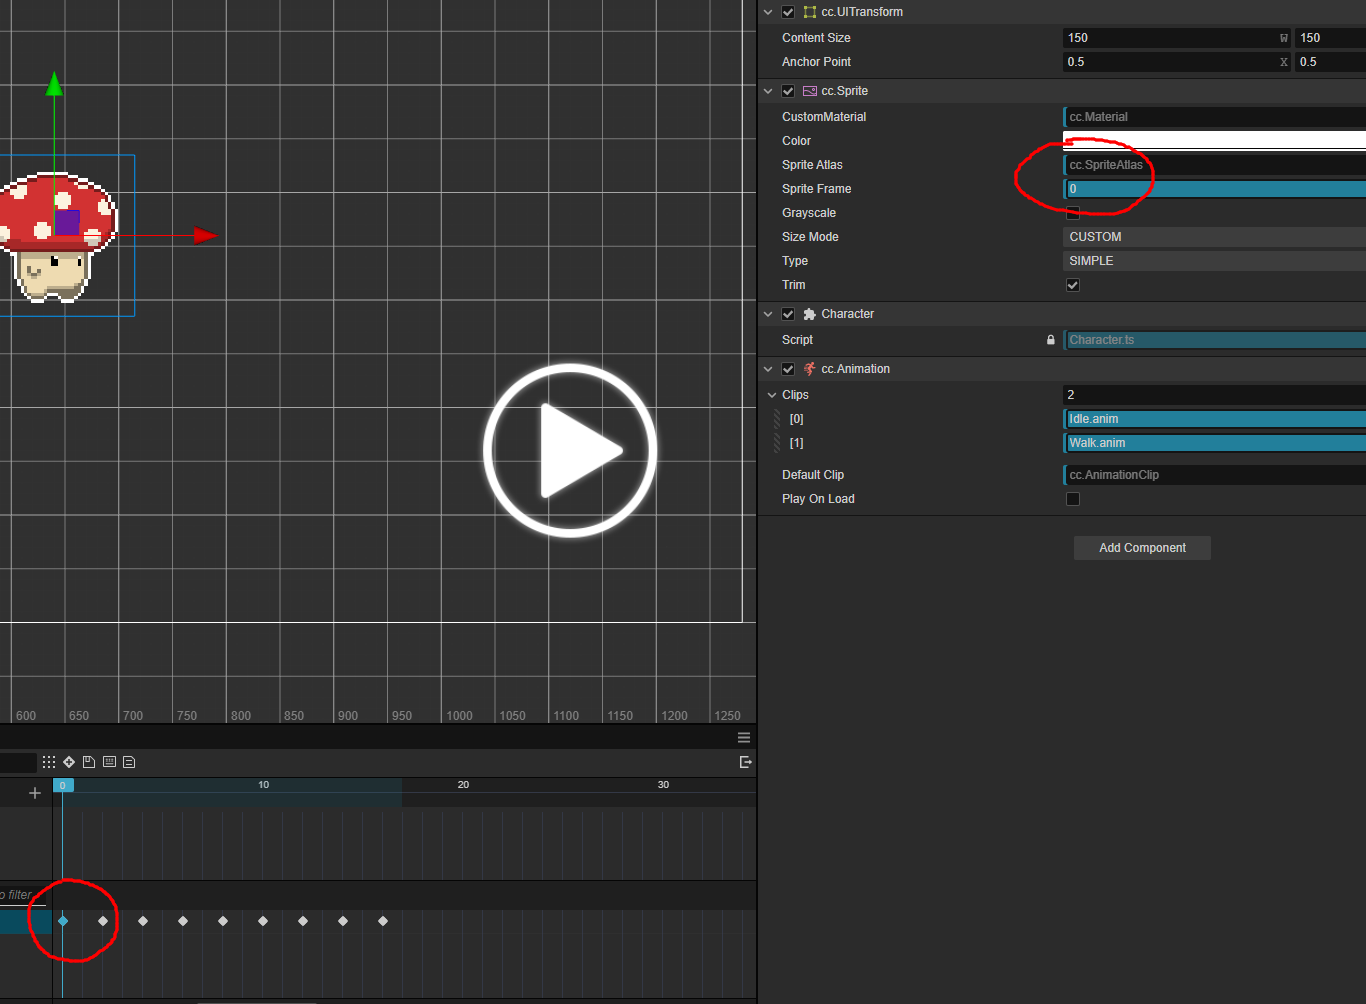
Property에 마우스를 클릭해 저렇게
파란색으로 활성화를 시켜주고
객체의 sprite Frame을 바꿔준다
아 그립다 Unity의 녹화기능
어제부터 봤지만 이 엔진 참 별로다
(Cocos Creator)

만든 Animation Clip을 객체에 연결해준다
참고로 여기도 Animator가 있기는 한데
다루기가 어렵고 거지같다
import { _decorator, Component, Animation,AnimationState} from 'cc';
const { ccclass, property } = _decorator;

export enum CharacterState {
    Idle,
    Walk,
}

@ccclass('Character')
export class Character extends Component {
    private static instance: Character;
    private animation: Animation | null = null;

    private characterState: CharacterState =null;

    public static get Instance(): Character {
        return Character.instance;
    }

    onLoad() {
        if (Character.instance == null) {
            Character.instance = this;
        }
    }

    start() {
        this.animation = this.getComponent(Animation);
        this.UpdateState(CharacterState.Idle);

    }

    public UpdateState(state: CharacterState) {
        this.characterState = state;

        switch (this.characterState) {
            case CharacterState.Idle:
                this.IdleState();
                break;
            case CharacterState.Walk:
                this.WalkState();
                break;
        }
    }

    private IdleState() {
        if (this.animation) {
            this.animation.play('Idle');
        }
    }

    private WalkState() {
        if (this.animation) {
            this.animation.play('Walk');
            this.animation.once(Animation.EventType.FINISHED, this.onWalkAnimationEnd, this);
        }
    }

    private onWalkAnimationEnd() {
        this.UpdateState(CharacterState.Idle);
    }

}
일단 버섯도리에 Character Script를 연결해주었다
나름 Unity에서 쓰던 내용과 최대한 비슷하게 쓰려고
노력한 나의 흔적;;;;;
여기서는 export가 Public과 비슷한거 같다
using System.Collections;
using System.Collections.Generic;
using UnityEngine;

public enum CharacterState
{
    Idle,
    Walk
}

public class Character : MonoBehaviour
{
    public static Character Instance => instance;
    private static Character instance;
    private Animator animator;
    [SerializeField] private CharacterState characterState = CharacterState.Idle;

    // Start is called before the first frame update

    private void Awake()
    {
        if (instance == null)
        {
            instance = this;
        }
    }

    void Start()
    {
        animator = GetComponent<Animator>();
        characterRigidBody=GetComponent<Rigidbody2D>();
    }

    // Update is called once per frame
    void Update()
    {

    }

    public void UpdateState(CharacterState state)
    {
        characterState = state;

        switch (characterState)
        {
            case CharacterState.Idle:
                IdleState();
                break;
            case CharacterState.Walk:
                WalkState();
                break;
        }

    }

    private void IdleState()
    {
        if (animator != null)
        {
            animator.SetTrigger("isIdle");
        }
    }


    private void WalkState()
    {
        if (animator != null)
        {
            animator.SetTrigger("isWalk");
        }
    }


}
사실 이 코드를 참고해서 TypeScript식으로
해석한 것이 저 코드이다
TypeScript 코드의 WalkState 부분에는
private WalkState() {
    if (this.animation) {
        this.animation.play('Walk');
        this.animation.once(Animation.EventType.FINISHED, this.onWalkAnimationEnd, this);
    }
}

private onWalkAnimationEnd() {
    this.UpdateState(CharacterState.Idle);
}
뒤에 이런식으로 연결하는 부분이 있다
Animation.EventType.Finished
현재 재생 중인 애니메이션이 끝나면(Walk)
다시 Idle State로 변환해주는 기능을 연결한 것이다
https://docs.cocos.com/creator/2.2/api/en/classes/Animation.EventType.html
Cocos Creator 2.2 - Animation.EventType
No results matching ""
docs.cocos.com
import { Button,Label, _decorator, Component, Node,EventTouch,Vec3 } from 'cc';
import { Character, CharacterState } from './Character';
const { ccclass, property } = _decorator;

@ccclass('UIManager')
export class UIManager extends Component {

    @property(Button)
    leftButton: Button = null!;

    @property(Button)
    rightButton: Button = null!;

    @property(Node)
    mushroom:Node=null

    private onLeftButtonClick(event: EventTouch) {
        this.WalkEvent(event, true); // true는 왼쪽으로 이동을 의미
    }

    private onRightButtonClick(event: EventTouch) {
        this.WalkEvent(event, false); // false는 오른쪽으로 이동을 의미
    }

    private WalkEvent(event: EventTouch, direction: boolean) {
        Character.Instance.UpdateState(CharacterState.Walk);

        // Mushroom 노드 이동
        if (this.mushroom) {
            const moveAmount = 50; // 이동량을 필요에 따라 조정
            const currentPosition = this.mushroom.position;
            const newPosition = direction ? currentPosition.subtract(new Vec3(moveAmount, 0, 0)) : currentPosition.add(new Vec3(moveAmount, 0, 0));
            this.mushroom.setPosition(newPosition);

            const scaleX = direction ? -1 : 1;
            this.mushroom.setScale(new Vec3(scaleX, 1, 1));

        }
    }

}
그리고 아까 양 옆에 있던 버튼에
클릭 이벤트를 만들어주었다
direction이 true면 왼쪽, false면 오른쪽으로 간다
그리고 여기는 sprite Flip이 따로 없는거 같았다
그래서 좌우 반전을 하고 싶다면
x scale에 -1 곱하면 된다
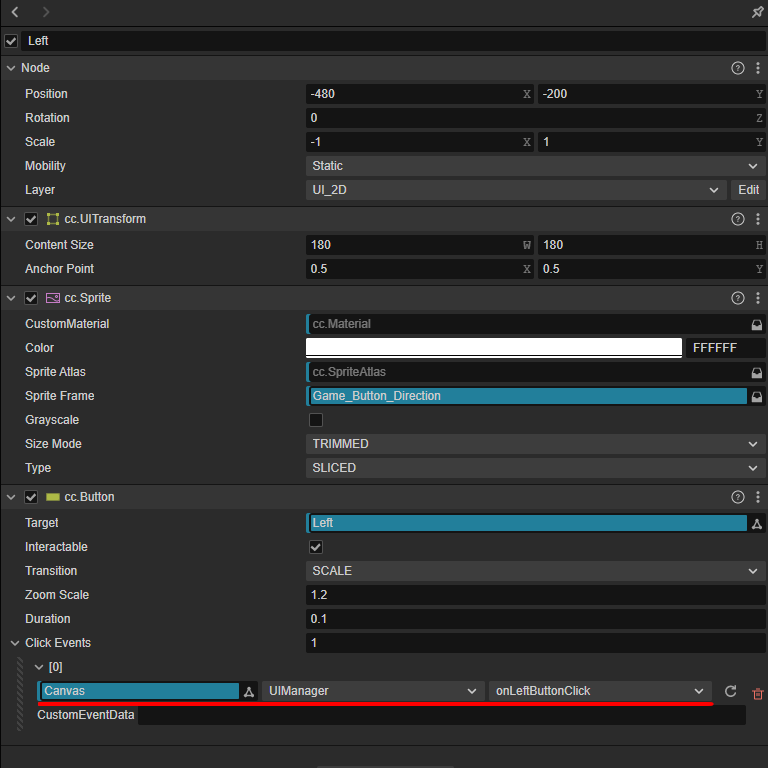
만들어준 기능을 버튼에 연결해주면 끝!!
그럼 안녕~~~~~~~~~~
'Game Develop' 카테고리의 다른 글
| [ Day 4 ] [PreviewInEditor] Cannot read property 'SetActive' of null (0) | 2024.07.04 |
|---|---|
| [ Day 3 ] Each script can have at most one Component. (0) | 2024.07.03 |
| [ Day 1 ] 카운트하는 버튼을 만들어보자 (0) | 2024.07.01 |
| 해결 한 오류.... Animator와 Rigidbody (0) | 2024.06.22 |
| 해결 못한 오류.... Animator와 Rigidbody (0) | 2024.06.22 |